If you want to sell Shopify products on affiliate websites, there are two practical ways to do it. The first is Shopify Collabs, Shopify’s affiliate marketing app for eligible plans. It supports affiliate links, discount codes, sales tracking, and commission payments, though Shopify currently notes that new creator signups are not open.
The second is an embedded approach, where your products appear directly on the partner’s page with a working checkout, so customers buy without ever leaving the affiliate’s site.
This post covers the embedded route: how to set up affiliate partners, assign commission structures, connect your products to the right partner pages, and track performance across your whole network.
- You can sell Shopify products on affiliate websites two ways: through tracked affiliate links via Shopify Collabs, or through embedded product components with on-page checkout via EmbedUp.
- EmbedUp lets you place a shoppable product block directly on a partner’s site so customers browse and buy without leaving that page.
- Affiliate management requires EmbedUp’s Pro plan ($29.99/month), which covers partner records, commission structures, component assignment, and attribution analytics.
- Commission can be fixed (flat amount or percentage) or tiered (rate increases with order value), and payouts are processed manually outside the app.
- Create one component per partner page for clean attribution, and always assign the affiliate inside the component settings, not just in the affiliate record.
Table of Contents
Why the Path From Affiliate Link to Checkout Loses People
The standard affiliate link works like this:
A reader clicks a link in a blog post ➡ lands on your Shopify store ➡ finds the product ➡ adds it to cart ➡ and checks out.
That’s four to five steps between the moment someone is ready to buy and the moment they actually do it, and each step is a chance to leave.
The bigger issue is context. When a reader is halfway through a recipe article or a gear review, they’re in a reading mindset. Clicking away to a storefront breaks that. By the time they’ve navigated to your product page, the buying impulse has competed with everything else on your store: other products, a navigation bar, a pop-up asking for their email.
Embedded selling keeps the transaction where the intent was created. The product appears inside the article, the review, or the landing page, and the customer completes the purchase right there. The affiliate’s content does the selling work, and the checkout confirms it without interruption.
What Selling on a Partner Website Actually Looks Like
With EmbedUp,
- You create a product component in your Shopify admin,
- configure how it looks and behaves, and
- generate a code snippet.
- Your affiliate pastes that code into their site. Most pages that allow custom HTML or script embeds can work: WordPress posts, Webflow pages, Wix pages, Ghost articles, Squarespace pages, or standalone landing pages.
- Once it’s live, the reader sees your product images, titles, pricing, and variant options directly inside the partner’s page.
- They can add to cart, review their selection in a drawer, and check out.
- The order goes through your Shopify checkout.
- Your inventory and pricing stay synced automatically.
A food blogger writing a coffee brewing guide can embed your starter kit directly under the instructions. A fitness creator reviewing supplements can place the product component next to the item they’re recommending. A niche review site covering outdoor gear can embed a curated selection inside each article. This is how merchants can sell Shopify products on affiliate websites without forcing readers to leave the content. In every case, the product is already there when the reader is ready to buy.
How to Set Up Your Affiliate Partners in EmbedUp
Affiliate management is available on EmbedUp’s Pro plan at $29.99 per month. The setup has five parts, and all five need to be completed for tracking to work correctly.
Step 1: Add affiliate information
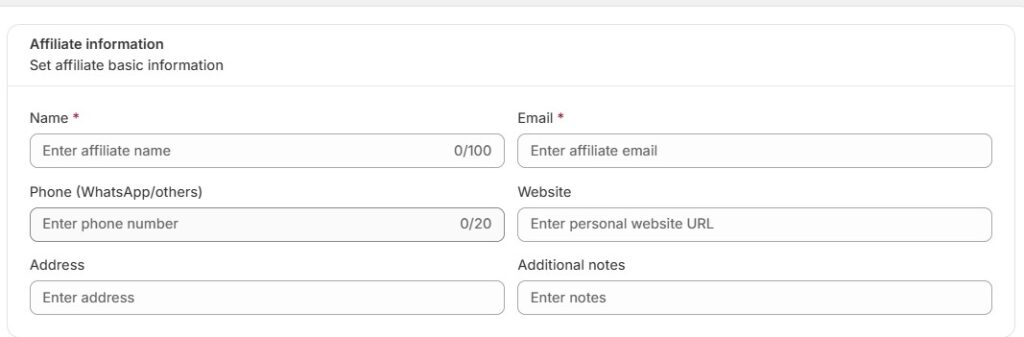
In the Affiliate information section, enter the affiliate’s basic details.
- Enter the affiliate’s Name and Email. These are required and use the email they use for communication or affiliate access.
- Add their Phone / WhatsApp number, if available. (Optional)
- Add their Website URL, if they have one. This helps you identify where they may promote your products.
- Enter their Address, if needed for your records.
- Use Additional notes to add internal details, such as audience type, promotion agreement, niche, or special instructions.
Step 2: Set the commission
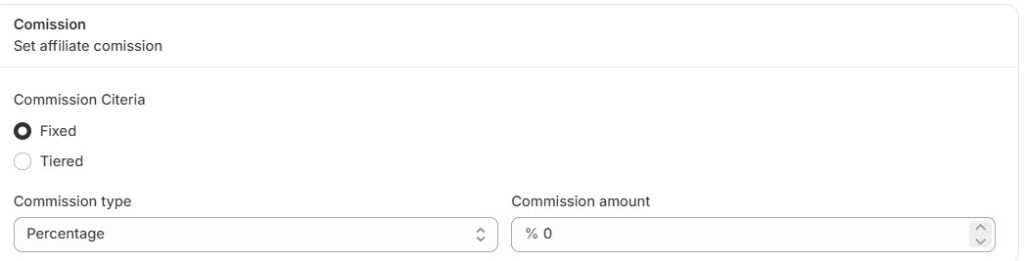
In the Commission section, choose how the affiliate will earn commission.
- Under Commission Criteria, choose one option:
Fixed: Select this if the affiliate will receive the same commission rate for every eligible referral order.
Tiered: Select this if the affiliate’s commission should change based on performance, sales volume, or another tier-based rule. - Under Commission type, choose how the commission will be calculated. For example, choose Percentage if the affiliate should earn a percentage of each referred order.
- Enter the Commission amount. Example: If the commission type is Percentage and you enter
10, the affiliate earns 10% commission on eligible referred orders.
Step 3: Add payout information
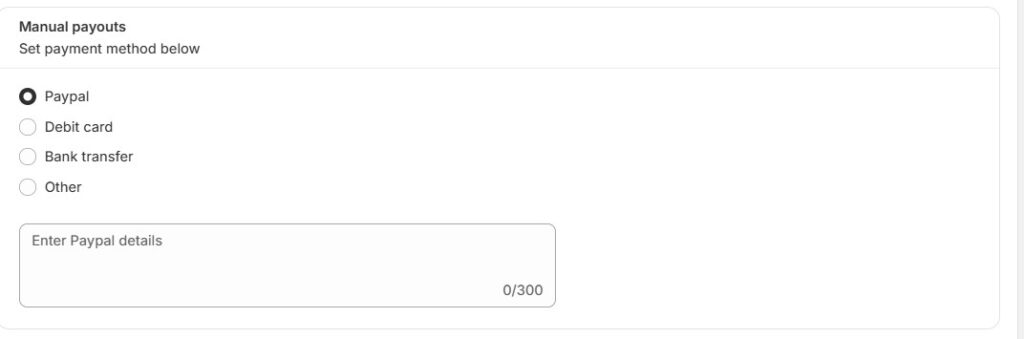
In the Manual payouts section, select how you plan to pay the affiliate.
- Choose one payout method:
PayPal
Debit card
Bank transfer
Other - Enter the payout details in the text box below. For example, you can add PayPal email, bank transfer notes, or other payment instructions. Only enter details that the affiliate has agreed to share with you.
Step 4: Choose affiliate status

In the Status section, decide whether the affiliate should be active immediately.
- Select Approve if the affiliate is accepted and ready to start promoting.
- Select Pending if you want to review the affiliate before approving them.
- Select Reject/Disabled if the affiliate should not be active.
Step 5: Save the affiliate
After completing the required fields and reviewing the information, click Add Affiliate. The affiliate will be saved with the commission, payout method, and status you selected.
How to Sell Shopify Products on Affiliate Websites
This guide is to create an affiliate component to sell Shopify products on affiliate websites. You can connect the component to a specific product, assign it to an affiliate, and use it on partner or affiliate-owned pages for easier promotion and tracking.
Step 1: Add the component title and description
This information helps you identify the component inside the app. In the Title & Description section:
- Enter a clear Title for the component. Example:
Summer Affiliate Product Component - Add a short Description. Keep it simple and easy to recognize later. Example:
Component for John’s summer campaign.
Step 2: Choose the cart behavior
In the Cart behavior section, choose what happens when a customer clicks the component.
- Select Buy Now Checkout if you want customers to go directly to checkout.
- Select Add to Cart Open Drawer if you want the product to be added to the cart first.
For affiliate campaigns, Buy Now Checkout is usually better when you want a faster path to purchase.
Step 3: Choose where the component applies
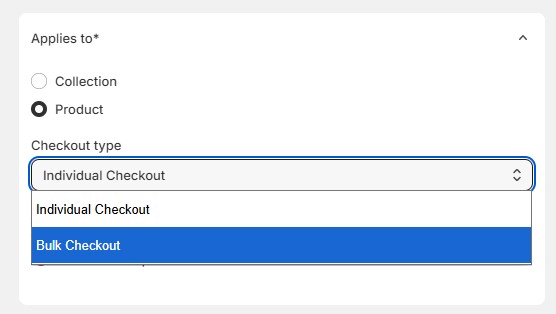
In the Applies to section:
- Select Collection if the component should be connected to a collection.
- Select Product if the component should be connected to a specific product.
- Choose the Checkout type.
- Search for the product or click Browse to select it.
Step 4: Choose the layout preview
In the Layout preview section, choose how the product layout should appear inside the component.
You can select:
- List
- Grid
- Grid slider
Choose the layout that best matches the page where you plan to place the affiliate component.
Step 5: Set the component status
In the Status section:
- Select Activate if you want the component to be live.
- Select Deactivate if you want to save the component but not use it yet.
Use Deactivate if you are still working on your Shopify affiliate program setup and do not want the component to appear live yet.
Step 6: Assign an affiliate
This is the most important section for affiliate tracking.
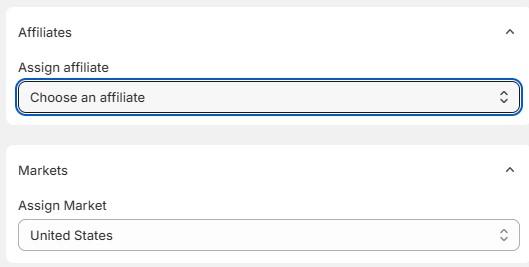
In the Affiliates section, you will see the field Assign affiliate.
- Click the Choose an affiliate dropdown.
- Select the affiliate you want to connect with this component.
- Make sure you choose the correct affiliate before saving.
The selected affiliate will be connected to this component. This helps you track which affiliate is responsible for the campaign, especially when you embed Shopify products on partner websites.
For example, if you are creating a component for an affiliate named John, select John from the dropdown. Then use this component on John’s affiliate page, blog, landing page, or promotional content.
Important note: Only assign one affiliate to the component if the component is meant for that specific affiliate’s campaign. This keeps tracking cleaner and makes it easier to review affiliate performance later.
Step 7: Assign the market
In the Markets section:
- Open the Assign Market dropdown.
- Select the market where this component should be used.
For example, if the affiliate campaign is for the United States, choose United States.
Step 8: Review optional settings
You can also review these sections if needed:
- Button style: Customize how the component looks.
- Settings: Adjust additional component behavior.
- Custom CSS: Add custom styling if you want the component to match your storefront design.
- Tracking: Configure tracking-related options if available.
Step 9: Save the component
After completing the setup:
- Confirm the correct product or collection is selected.
- Confirm the component is Activated if you want it live.
- Confirm the correct affiliate is selected under Assign affiliate.
- Save the component.
Once saved, the affiliate component will be ready to use for the selected affiliate campaign.
How Commission Tracking Works
EmbedUp tracks affiliate performance through the component assigned to each partner. When a customer visits, clicks, adds a product to cart, or completes an order through an embedded component, the activity is connected back to that component and the affiliate selected for it.
Inside the analytics dashboard, you can review key performance data such as total sales, total orders, visitors, add-to-cart clicks, traffic sources, and top affiliates. You can also filter the dashboard by date range and component, making it easier to see how each affiliate campaign is performing.
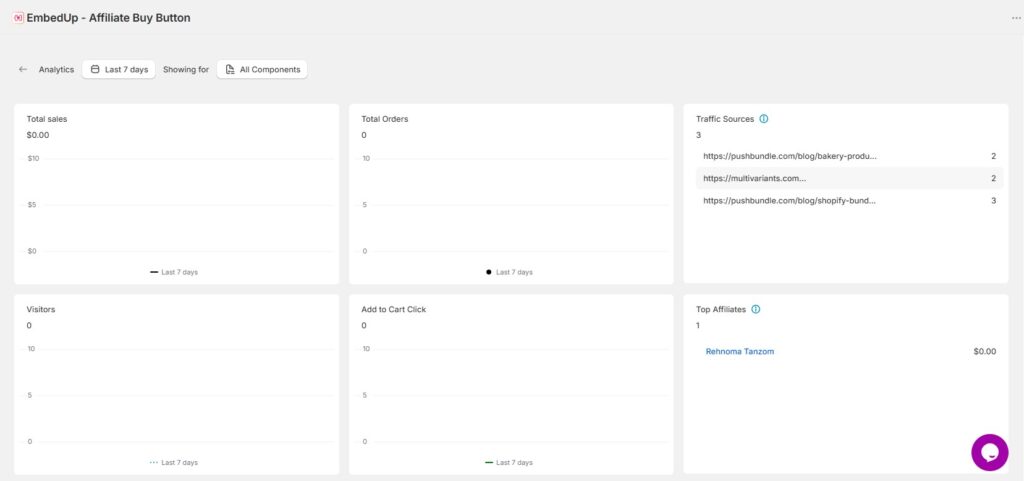
This is especially useful when you want to sell Shopify products on affiliate websites and understand which partners, pages, or campaigns are actually driving traffic and sales.
For deeper campaign tracking, each component also includes tracking fields for UTM source, UTM medium, UTM campaign, and a custom tracking code. These values help you separate performance by partner, campaign, channel, or placement inside your analytics setup.
At the component level, the visitor, add-to-cart, and order data can help you spot where customers are dropping off. For example, high visitors with low add-to-cart clicks may suggest the product is not well matched to the partner’s audience. High add-to-cart clicks with low orders may point to checkout friction, pricing concerns, or a weak offer.
One important thing to note is that affiliate payouts are handled manually. EmbedUp helps you track affiliate activity and performance, but the actual payment is completed outside the app using the payout method saved in the affiliate’s profile.
What Your Affiliates Actually Need From You
Once you’ve created the component and assigned the affiliate, the partner mainly needs two things: the embed code and clear guidance on where to place it. This is an important part of your Shopify affiliate program setup, because the component must stay connected to the correct affiliate for tracking to work properly.
After saving the component, copy the embed code from EmbedUp and send it to your partner. They can paste it into an HTML block, custom code block, or embed section on their website, depending on what their platform supports. The embedded component will display the Shopify product or collection you selected, along with the layout, styling, cart behavior, and checkout flow configured inside EmbedUp.
Also tell your partner where the component should appear. For example, they may place it inside a product review, comparison article, landing page, resource page, or campaign page. The placement matters because better context usually leads to better clicks and more qualified traffic.
If you later change the component settings inside EmbedUp, review the live embedded placement to make sure everything still appears correctly. If you deactivate a component, let your partner know first, especially if the page is already sending traffic or sales.
Tracking Performance Across Multiple Partners
EmbedUp’s analytics dashboard helps you review affiliate and component performance from one place. You can track data such as total sales, total orders, visitors, add-to-cart clicks, traffic sources, and top affiliates. This makes it easier to understand which partners and placements are helping you embed Shopify products on partner websites and turn that traffic into sales.
For accurate reporting across multiple partners, use a consistent UTM naming convention from the start. Inconsistent naming makes it harder to compare performance over time, especially once your affiliate list grows. A simple structure like utm_source=partner-name, utm_medium=embedded-component, and utm_campaign=campaign-name keeps your reporting readable and easier to filter.
Create a separate component for each partner or major placement instead of sharing one component across multiple affiliate pages. It takes a few extra minutes upfront, but it keeps attribution cleaner and makes it easier to compare partner performance later.
You can also use the traffic source and affiliate performance data to spot weak points in the funnel. For example, high visitor numbers with low add-to-cart clicks may mean the product does not match the partner’s audience. High add-to-cart clicks with low orders may point to checkout friction, pricing concerns, or a weaker offer.
Sell Shopify Products on Affiliate Websites: FAQ
Does Shopify have a built-in way to sell products on affiliate websites?
Shopify Collabs handles link-based affiliate management for eligible plans, covering affiliate links, discount codes, sales tracking, and commission payments. If you want partners to sell your products directly on their own pages with an embedded checkout, that requires a third-party tool like EmbedUp.
Do affiliates need a Shopify account to embed my products on their site?
No. Your affiliate just needs a page that accepts custom HTML or a script embed. The component runs from your Shopify store in the background, and the partner doesn’t need any Shopify access at all.
Can I assign the same component to multiple affiliates?
EmbedUp assigns one affiliate per component. To give the same product set to multiple partners, duplicate the component and assign a different affiliate to each copy; that keeps each partner’s sales data separate and accurate.
How do I pay my affiliates through EmbedUp?
EmbedUp tracks what each affiliate is owed based on attributed orders and the commission structure you set. The actual payment is processed manually by you, outside the app, through whichever payout method you stored in their record: PayPal, bank transfer, debit card, or another arrangement.
What happens if an affiliate’s site blocks the embed script?
If the partner’s platform blocks third-party scripts through a content security policy or script sanitization setting, the component won’t render even though the affiliate record and assignment are valid. Check with the partner about their platform’s embed permissions before sending the code, as this can happen on platforms with stricter security configurations.
Conclusion
If your current affiliate setup relies on discount codes and redirect links, it works, but it asks a lot of the customer. Every extra click between a recommendation and a completed purchase is a place where the sale can stall.
The embedded approach lets you sell Shopify products on affiliate websites in a way that keeps the purchase where the buying intent actually is: on your partner’s page, next to the content that created it. If you work with bloggers specifically, the same embedded setup that powers your affiliate tracking also gives your partners a way to monetize their content with your products without sending readers away. EmbedUp’s Pro plan covers the full workflow, from creating the affiliate record and setting commission tiers to assigning the component and reading performance data by partner. Payouts are still manual, so factor that into your process if you’re planning to run a large partner network.
Start with one or two partners, verify that orders are attributed correctly, check the analytics after the first week, and then scale from there.